Introduction
Hi, my name is Bulatov Evgeni.
Particles are an integral part of computer graphics. Cinema, TV, and video games
are using them to create impressive effects.
I'll try to give you some basic ideas concerning fire creation (backed by definite directions), so that you could go further in this area by yourself. The particles are not limited to the fire only, there is a whole world of wonderful effects.
In the included lesson data there is a Magic Particles emitter file, particles textures and an avi video file with a fire animation.
Part I. Texture creation
Particle textures are very important for creating nice looking fire. Experimenting with them you would get a different fire effect every time.
Magic Particles can read the PSD file format and even its alpha-channel (for transparency), but for creating fire we will use a special blend mode (it's called Screen in Photoshop), so alpha-channel is not needed.
With this blend mode the black color is completely transparent while other colors lighten the picture under them. To create fire particles I painted textures 256 × 256 on a black background. Later you could resize them smaller, but it's easier to draw them when they are big. Here is what I got:
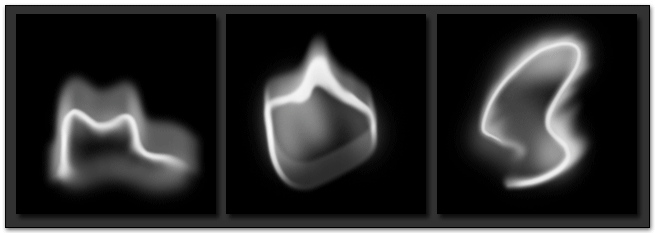
I used a thin brush with soft edges and then used the Smudge Tool, duplicating layers when necessary and using Gaussian Blur.
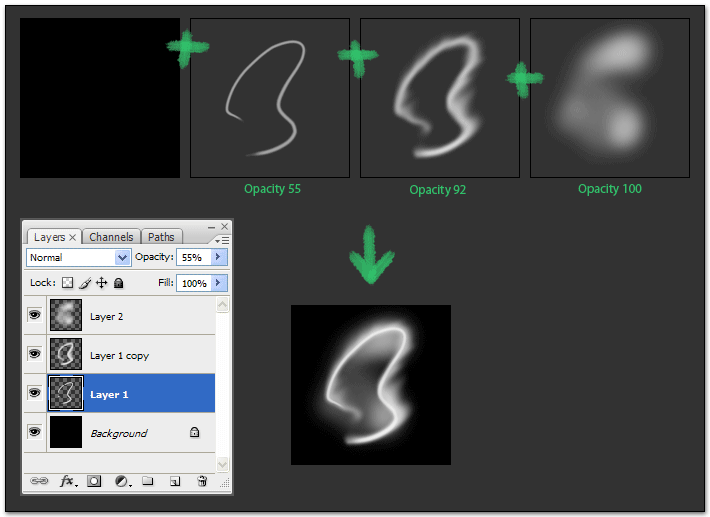
Make some textures, about three to six. After creating the effect I experimented with the textures, deleting the ones that did not fit into the overall picture and making new ones instead. As I see it, the final result is mostly determined with the form of the tongues of flame you have drawn.
Part II. Particles Editor
After the textures are ready it's time to use the particles editor.
Run Magic Particles. At the top you can see the button panel, hit the «Create emitter», button and after that «Create particle type inside Emitter», .

In the preview window you'll see something gray and odd looking. In its center there is an emitter's icon in a square frame. Drag the emitter to the bottom edge of the screen and deselect the «Show emitter» and «Show clip area» check boxes on the bottom panel.
To load the textures drag the files onto the texture preview window (or use the «Load texture» button, you can select multiple files in an open file dialog window).
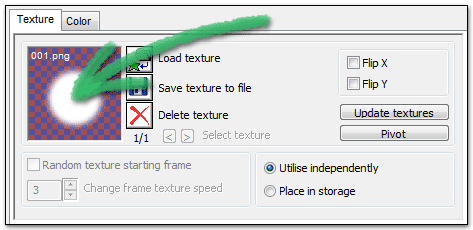
Now go to the Color tab and check the «Intense» box (it's a special blend mode for luminous particles, corresponding the Photoshop screen blend mode). Now click the gray rectangle at the bottom, you'll put a marker there. This way you'll specify the particles color during their lifespan.
Adjust the color as following:
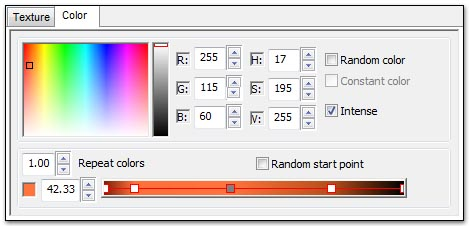
The final marker must be black, so that the particles are faded in the end (this is why we are using the «Intense» blend features). This is the color of the flame.
Now each particle's texture is changing in consecutive order. But we didn't make an animation, so we do not need this. Go to the «Texture» tab and enter zero in the «Change frame texture speed». Also check the «Random texture starting frame». Now each particle has a random texture not changing during its lifespan.
Now all we have to do is to adjust the particles motion and you'll get a real fire! But first change the «Visibility range» (at the bottom panel) to 9% start and 95% end range visibility. This way the program doesn't show the start and the end of the effect if you don't need them.
Fire always goes up with a constant speed, emitting tongues of flames of different length. As it goes up it gets thinner and finally fades. Now step by step we'll set the particles motion according to this model.
Let's start with the emitter. Click on the emitter in the Emitter tree (on the left) and in the top diagram change the point emitter type to the line type.
The particles will emit from this line. It has two parameters, the blue graph — the incline degree, the green one is the line length. The default parameters of 0 degrees and 100 length suit the fire nicely.
Now let's change the angle of emitting the particles. Next diagram is the «Emission direction, degrees». Set the values 36° and 144° so that the particles go up.
Now it doesn't resemble fire very much. Switch to the Particles and hit the «Diagram Settings» button.

Here are various parameters of particles. As all the parameters are in one place it is very convenient to adjust them in this window. Such parameters as «Life», «Number», «Size», «Velocity» are interdependent. For instance the high value of «Velocity» will increase the motion speed of particles and at the same time will make flame longer. But decreasing the «Life» parameter could shorten the fire size.
Adjust the parameters as you like or take mine:
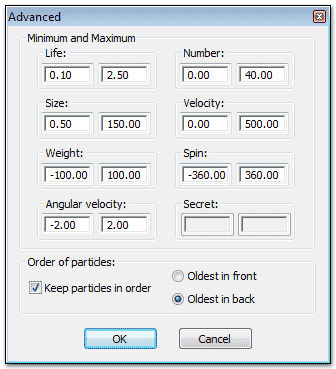
Looks like a good flame thrower, not too bad, but we'd really like a nice small campfire. Actually, as I was tuning the particles I adjusted both the graphs and the Minimums and Maximums in this window, until I got the result I needed.
Let's adjust the diagrams. Now the fire looks too dense, the flame is too bright. Find the diagram «Visibility over life» (factor) and decrease it to 35.
Now we are going to set the particles motion. The flame must go up but now it's thrown sideways. It happens because of the wide angle of emitter direction. When making fire I wanted the flames first to go sideways and then go upward. Like this:
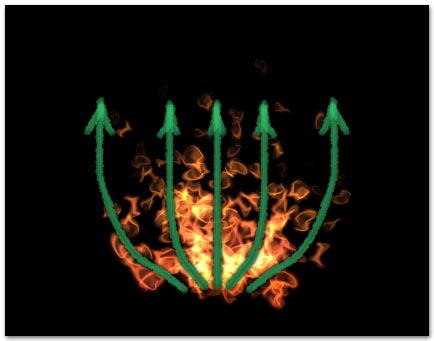
Now the flame goes sideways and we want to direct it upward. We can do this using the «Weight» parameter, setting its value to a negative number. The particles will «float» upward.
In Magic Particles there are two types of graphs. The ordinary (gray icons) and the Factors (red icons). The usual graphs adjust the particles properties during the effect's lifespan (X axis is the effect's lifespan). But factors change the particles during the lifespan of the particle (X axis is the particle's lifespan).
With the help of the factor graphs I made it so that the particle motion is determined by the «Velocity» in the beginning and by the «Weight» later on. It looks like this:
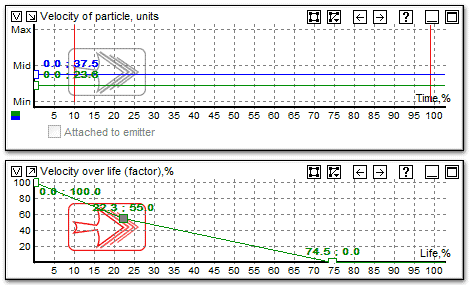
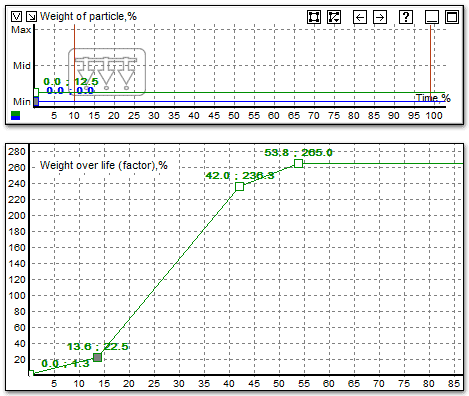
This way I've got the desired fire motion.
As the real flame is first wider and then gets thinner in the upper position I adjusted the diagram «Size over life (factor)» like this:

You can watch the movement of only one particle if you check «Single particle» in the «Number of emitted particles» diagram. It is helpful when there are too many particles making it difficult to understand their motion.
Now the flame is still rather intense and high. Decrease its height and imitate its fluctuations. This is what I've got after adjusting «Life of particle» and «Number of emitted particles» diagrams:
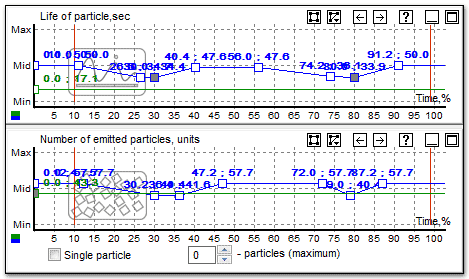
The interesting thing about the diagrams with two lines is that they allow you to get the random values in the interval between the green and the blue lines. This means that each created particle will get the different parameter's value.
Not a bad result, but to make the fire more vivid I made the particles spin. The diagram «Spin of particle» is set from 0 to 100, and the diagram «Spin over life (factor)» is made fading to eliminate the unnatural spin at the top.

This is my result:
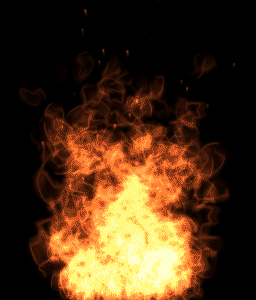
You can add some sparkles to the fire by creating a new particle type inside the emitter, and also some smoke.
For sparkles, paint a white dot or a stroke on a black background and use the «Intense» parameter. For smoke you'll have to experiment with textures. As smoke doesn't shine, turn the «Intense» off and set a blue tint in the color settings.
This is my simple way of creating fire in particle editors. If you download the file with the example and the textures you'll be able to see my fire version in Magic Particles.
Part III. Export and integration into a game
After the fire has been created it has to be integrated into a game. The simplest way in this case is to render the fire to a frame-by-frame animation and looping it after that. Then you'll be able to play this animation as sprites in any place within the game.
Unfortunately the nature of such editors doesn't allow you to make an infinite loop process. We'll have to cheat :) But first we have to get the sequence of frames. There is nothing difficult about it, have a look at the export window of Magic Particles:
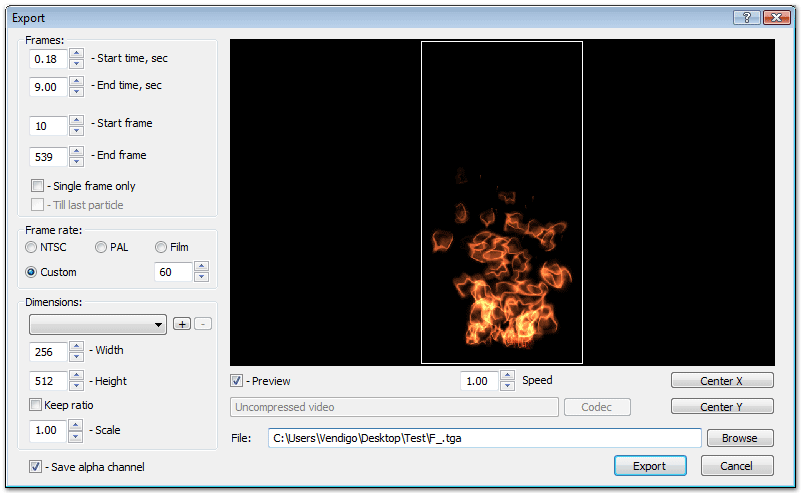
Choose the frame size, usually multiple of power of 2 (for example 128, 256, 512), file type (any graphic format except lossy compression, alpha-channel not needed) and hit «Export».
You'll get too many frames, so you'll need to select a small section, 1-3 seconds long. It'll be quite enough.
To create a smooth transition I used Adobe After Effects. Not going into detail I'll just show you a couple of snapshots:
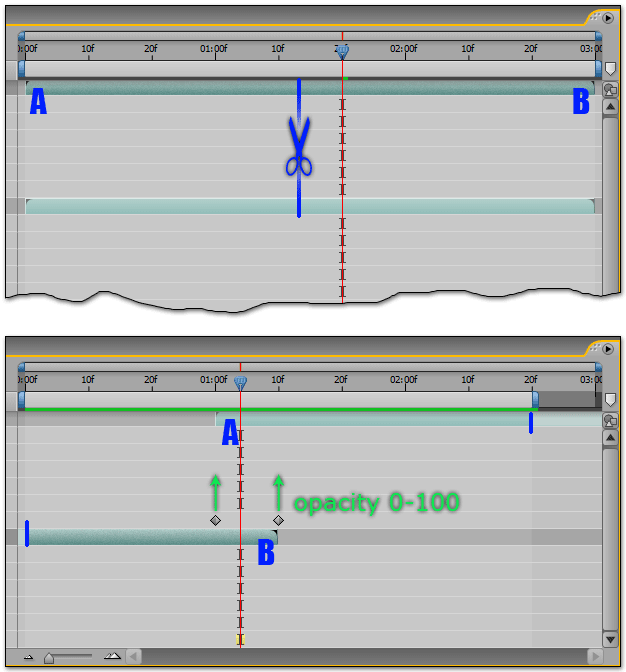
I imported the frame sequence into After Effects and copied the animation as a second layer. After that I «cut» the tracks in the middle and moved them so that one track ended in the place of the cut and the other began. I shortened the composition time to make the tracks overlap. And then I adjusted the opacity of the upper layer so that it changed from 0% to 100% from A to B.
After this operation the transition becomes almost unnoticeable. We only have to render the composition into a frame sequence and see how it works in the game.
Another way to export fire into a game is to use a developer version of the program Magic Particles (Dev). This version has an API to export the special effects into the game engine at a level of processing particles. The example API use you can download here.
Conclusion
Experimenting with your results you can make the fire as fierce as a forest fire or calm as a gas stove fire. You can make it brighter, dimmer, quicker or slower. Real fire is sometimes very different and having toyed with the parameters you can make it the way you wish.
In conclusion I would like to thank Yasha a.k.a Snork, Alexei a.k.a. Odin_KG and Masha Zaitseva for the help in the lesson creation.
Ask your questions and put you comments. With best wishes Evgeni Vendigo Bulatov.
The translation from Russian by Grigori Bulatov, with additional clean-up by Drew Sikora. Please put any comments concerning the quality of translation.